Mattress Stitch Crochet: A Seamless Joining Guide
Learn mattress stitch crochet techniques to join motifs invisibly. This practical guide covers tools, steps, tips, and troubleshooting for crisp, seamless crochet projects.

Master mattress stitch crochet to join crochet motifs invisibly and create seamless edges. This guide covers essential tools, step-by-step methods, and common pitfalls for beginners and seasoned makers. By the end youll be able to join granny squares, blankets, and panels with a neat, nearly invisible seam. We will use the term mattress stitch crochet to describe the invisible join technique originated in knitting, adapted for crochet. Youll learn how to pick yarn, tension, and weave to ensure durability.
What mattress stitch crochet is and where it comes from
Mattress stitch crochet is a joining technique inspired by the knitting 'mattress stitch', adapted for crochet to create nearly invisible seams between motifs or panels. In this method, you slip-stitch or crochet along the edges in a way that the seam sits flush with the fabric surface, reducing gaps. According to Mattress Buyer Guide, the concept of mattress stitch crochet combines careful edge alignment with consistent tension to achieve a smooth join. The Mattress Buyer Guide team found that beginners often over-tighten the seam, creating puckers; the alternative is to test tension on a swatch and adjust as needed. The goal is to hide the seam while maintaining structural durability, especially in blankets and pillow covers. This article focuses on practical steps you can apply to common crochet motifs like granny squares, granny-square blankets, and modular panels. Youll notice how subtle changes in technique change the final look.
When to use mattress stitch crochet
Use this technique whenever you need a clean, unified surface across multiple crochet pieces. Common projects include joining granny squares into a sofa blanket, assembling modular panels for a cover, or edging a throw so the seam remains nearly invisible. The method is particularly valuable when color blocks meet or when the finished piece will be displayed without blocking or pressing. For best results, plan your motif layout before starting and note the seam line. The Mattress Buyer Guide team recommends practicing with a scrap swatch to calibrate tension and gauge. In some cases, a slight edge trimming of the motif edges can help the seam align more neatly. If youre working with high-contrast yarns, the seam can be designed to hide better; with low-contrast colors, you may rely on careful stitch selection rather than color tricks. Overall, mattress stitch crochet shines in projects where you want durability plus a refined, professional look.
Common methods and terminology
Although the term mattress stitch crochet sounds like a knitting technique, crochet has its own practical methods to realize an invisible seam. The most common approach is the invisible join, where you work along the seam line with a targeted sequence of slip stitches or single crochets that anchor edges from opposite motifs. Another option is a ladder-like mattress seam, sometimes created by working through the back loops only to keep the front surface smooth. The best choice depends on yarn weight, stitch height, and the pattern's geometry. For lighter yarns, the invisible join tends to disappear more cleanly, while bulkier yarns may benefit from a slightly more pronounced seam that stabilizes the join. In all cases, consistently aligning edges before you begin and maintaining even tension will maximize results. By testing variations on a swatch, youll identify the method that delivers the closest match to the surrounding fabric.
Tools and materials you need
Before you begin, gather the essentials:
- Crochet hook that matches your yarn weight (for most light-to-medium yarns, size G-6 to I-9 is common).
- Tapestry needle or yarn needle for weaving ends.
- Scissors and a measuring gauge or ruler for trimming and consistent stitch counts.
- Stitch markers to hold edges in place during alignment.
- A ball or skein of the same yarn used in your project, plus a small swatch for practice.
- Optional: a seam foam or blocking mats to help visualize the finished seam.
Having these tools ready helps prevent interruptions and keeps your seam neat.
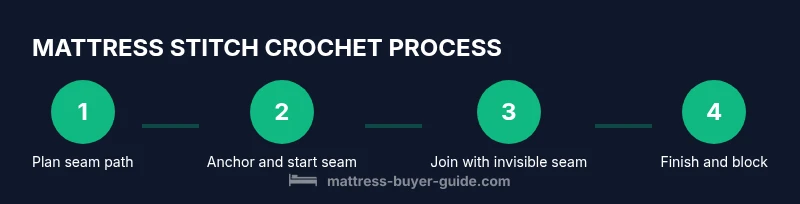
Step-by-step overview
The following overview shows the essential actions youll perform, with quick rationale for each step.
- Prepare motifs and plan seam line — lay out pieces and mark the intended seam path to avoid misalignment.
- Anchor yarn at seam edge — thread a length of yarn and secure at the starting point so the seam wont shift.
- Work along seam with invisible join — insert the hook along the edge from back to front, using a few slip stitches or single crochets to bind edges securely.
- Check alignment and adjust — periodically press the panels together and rework any small gaps with extra stitches.
- Finish seam and weave ends — snip, thread the tail, and weave it through the seam interior to hide it.
- Block and assess the finished piece — gentle blocking helps settle the seam flush with the surrounding fabric.
Tip: Keep a consistent tension throughout the seam and use a swatch to calibrate before sewing on your actual project.
Care, maintenance, and troubleshooting
Care for mattress stitch crochet projects like you would other delicate crochet pieces. Hand-wash or use a gentle cycle with cold water and lay flat to dry; avoid wringing to minimize seam distortion. If you notice puckering along the seam, try relaxing tension on the join, or redo a short portion with lighter stitches to re-seat the fabric. For high-contrast color seams, consider a darker yarn that blends more naturally, or add a subtle top-stitch along the seam for added durability. Always block or press finished pieces with care to avoid heat damage, and store flat to preserve the seam alignment over time.
Real-world project example: joining granny squares into a blanket
Imagine youre assembling a cozy crochet blanket made from 12 double crochet granny squares. Using mattress stitch crochet, you align squares edge-to-edge so the seam is barely visible on the front. Start by planning the row order, then join squares along the designated seam lines with a series of tiny slip stitches. When complete, weave in leftover tails and block the entire blanket to set the stitches. The result is a smooth, professional look that highlights color changes without distracting from the overall pattern. This approach is ideal for large projects where a clean, durable finish matters as much as comfort.
Tools & Materials
- Crochet hook (matching yarn weight)(Use a hook size appropriate for your yarn (e.g., G-6 to I-9 for worsted weight))
- Tapestry needle(Large-eye needle for weaving ends and finishing seam)
- Scissors(Sharp for clean cuts)
- Stitch markers(Helpful for keeping edges in place during alignment)
- Scrap yarn swatch(Test tension and seam before working on project)
- Measuring gauge or ruler(Optional but useful for consistency)
Steps
Estimated time: 25-40 minutes
- 1
Prepare motifs and plan seam line
Lay out all motifs with their edges aligned. Mark the intended seam path on the pieces so you can sew along a straight line without surprises. This step prevents misalignment and minimizes waste of yarn.
Tip: Mark seam lines with removable stitching markers or scrap yarn to avoid damaging the project. - 2
Anchor yarn at seam edge
Thread a length of yarn and anchor at the starting point of the seam. Secure with a small slip knot or a single starting slip stitch so the seam won’t shift as you work.
Tip: Use a light finger pressure to prevent the yarn tail from pulling the pieces out of alignment. - 3
Begin invisible join along seam
Insert the hook from back edge to front along the seam and work a short sequence of slip stitches or single crochets to bind edges together. Keep the stitch count even and the seam flush with the surface.
Tip: Go slowly the first few stitches to ensure you aren’t catching the wrong edge. - 4
Maintain tension and alignment
Continuously check alignment as you proceed. Adjust tension if you see gaps or puckers, especially where color blocks meet.
Tip: If you notice a wobble, pause and realign before continuing. - 5
Finish seam and weave ends
Finish with a secure tail and weave it through the seam interior to hide it. Clip excess yarn and gently tug to ensure the seam remains flat.
Tip: Weave tails in multiple directions for durability. - 6
Block and assess
Gently block or press the finished piece to settle the seam and fabric. Let it dry completely before use or gifting.
Tip: Blocking helps set the seam flush with the surrounding fabric.
FAQ
What is mattress stitch crochet?
Mattress stitch crochet is an invisible seam technique adapted from knitting. It aims to join crochet motifs with a nearly seamless line, using careful edge alignment and chosen stitch types to minimize gaps.
It's a way to join crochet pieces so the seam looks almost invisible, like a sewn seam.
How is it different from knitting mattress stitch?
Knitting’s mattress stitch uses stockinette fabric and a different set of seam moves. Crochet adapts the idea with slip stitches or single crochets along the edge, often resulting in a slightly different texture but a similarly clean line.
Knitters have a different technique, but crochet adapts the idea for a seamless seam.
What projects suit mattress stitch crochet?
Ideal for joining granny squares, modular panels, and blankets where a clean, durable seam enhances the finished look.
Great for blankets and cushions where you want a neat seam.
Can I fix a seam that puckered?
Yes. Loosen the seam, redo a short section with lighter tension, and ensure edges stay aligned during re-joining.
You can fix it by relaxing tension and re-doing a small portion carefully.
How long does it take to learn mattress stitch crochet?
With practice on swatches, most crocheters grasp the basics in a few sessions, then progress to more complex motifs.
It usually takes a few practice pieces to feel confident.
Watch Video
Highlights
- Plan seam line before joining
- Maintain consistent tension for a smooth seam
- Choose join method based on yarn weight and pattern
- Block finished pieces to set the seam